Defining TOCs and Mini-TOCs
ePublisher does not use the table of contents (TOC) in your source document when it generates the online table of contents. This process allows ePublisher to correctly apply conditions and variables to the TOC, and to format the TOC as needed for the output format. ePublisher bases the TOC on paragraphs from your source document. Depending on the output format you select, you can specify whether to generate the TOC and what file name to assign to the TOC. For more information, see Generating and Naming the Table of Contents File. You can also modify the appearance of the table of contents for some output formats. For more information, see Customizing the Navigation Pane in WebWorks Help and Modifying the Appearance of the Table of Contents in Dynamic HTML.
Defining the Table of Contents Structure (Levels)
By default, ePublisher attempts to automatically determine your source content's TOC levels. You can manually adjust those levels if the settings do not meet your requirements.
To define the table of contents structure (levels)
- Open your Stationery design project.
- On the View menu, click Style Designer.
- On the Project menu, click a target in the Active Target menu option that is an output format that supports this option.
- In Paragraph Styles, select the style you want to include in your TOC.
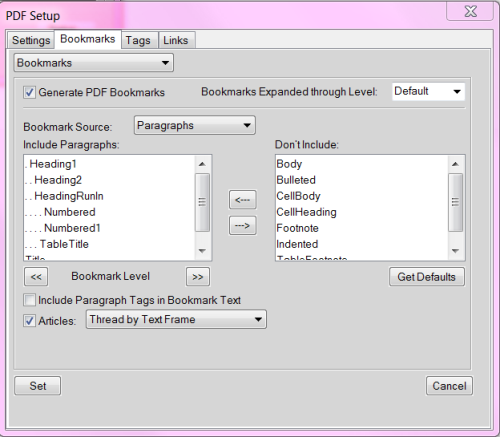
- On the Options tab, specify a value for the Table of contents level option. The default value, Auto-Detect, attempts to infer the necessary information based on your source content. Specify a value that indicates the level of the table of contents entry for the selected paragraph style. When working with Adobe FrameMaker, you can determine the levels by examining the PDF Bookmark levels for paragraphs that appear in the table of contents. Here is an example of the Bookmarks tab from FrameMaker 11, to navigate here, you would select File > Print.... Then click the PDF Setup... button.
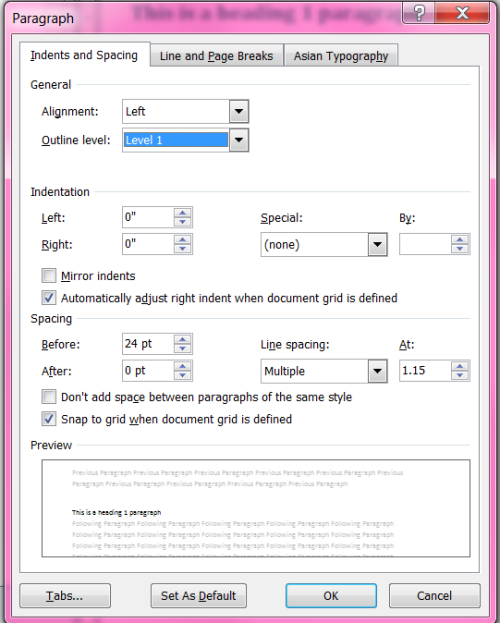
When working with Microsoft Word sources, the auto-detect values are based on the Outline level of each paragraph style. Below is a screenshot of the Word 2010 interface for each paragraph's outline level, to navigate here, you use the key combination Shift + F1.

Once you click the Outline Level hyperlink, you can select the desired level from the following window.
DITA XML auto-toc is taken from the map hierarchy. A good example would be from the sample input provided in the Exp_Design project located in the ePublisher directory in the Documents library, or by the
Program Files\WebWorks\ePublisher\<version>\Helpers\dita-ot\samplesGenerating and Naming the Table of Contents File
By default, once you have defined your table of contents structure using Style Designer, ePublisher generates the table of contents for your output. The Dynamic HTML format provide additional capabilities for users to prevent generation of the table of contents or to change the file name of the generated table of contents.
In the File Processing section of the target settings, you can also specify whether to include the table of contents, front matter, and index from your source documents in your generated output.
To specify additional table of contents target settings
- On the Project menu, select the Active Target you want to specify settings for.
- On the Target menu, click Target Settings.
- If you want to prevent ePublisher from generating the table of contents, set Generate table of contents to Disabled.
- If you want to change the file name of the generated table of contents, specify the file name you want in the Table of Contents filename field.
Defining the Table of Contents from an Irregular Heading Hierarchy
Many authors follow a regular heading hierarchy in their source documents. A regular heading hierarchy is one in which no levels are skipped in the hierarchy, as shown in the following example:
First Heading 1
  First Heading 2
    First Heading 3
    Second Heading 3
  Second Heading 2
Another Heading 1
  Another Heading 2
  Yet Another Heading 2
Note: If you use a regular heading hierarchy, this section does not affect your output.
Some documentation methodologies and processes require authors to skip levels in the hierarchy, which produces irregular heading hierarchies like the one shown in the following example:
First Heading 1
    First Heading 4
    Second Heading 4
  First Heading 3
Second Heading 1
  Another Heading 3
  Still Another Heading 3
Final Heading 1
This heading hierarchy in a source document, produces an irregular table of contents hierarchy. The previous example is irregular because all Heading 2 levels are skipped and several Heading 3 levels are skipped in the hierarchy.
Since your generated table of contents is created from paragraphs in the source documents, irregular hierarchies can cause an aesthetically displeasing table of contents in your output. ePublisher provides several settings for how to transform irregular heading hierarchies, such as Fully collapse, Don't collapse, Smart collapse, and Re-label. By default, ePublisher uses Smart collapse.
To specify how ePublisher transforms irregular heading hierarchies
- On the Project menu, select the Active Target you want to specify settings for.
- On the Target menu, click Target Settings.
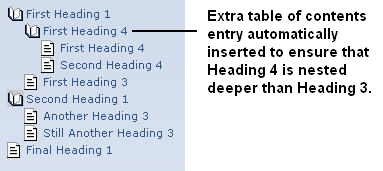
- If you want to eliminate skipped levels from the table of contents except where needed to preserve the correct relative hierarchy, set Collapse table of contents to Smart collapse. ePublisher removes skipped heading levels from the table of contents. However, if removing skipped levels results in, for example, a Heading 3 and Heading 4 displaying at the same level, ePublisher automatically inserts an entry into the table of contents to preserve the correct relative hierarchy. The irregular hierarchy in the previous example would be generated as follows.
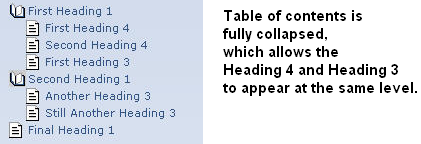
- If you want to eliminate all skipped levels from the table of contents, set Collapse table of contents to Fully collapse. ePublisher removes all skipped levels, regardless of the level at which they appear in the source documents. The irregular hierarchy in the previous example would be generated as follows.
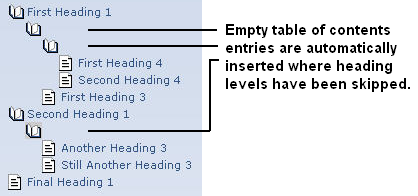
- If you want to duplicate the heading hierarchy of the source document with empty entries in the table of contents, set Collapse table of contents to Don't collapse. ePublisher automatically inserts empty table of contents entries for the skipped levels. The irregular hierarchy in the previous example would be generated as follows.
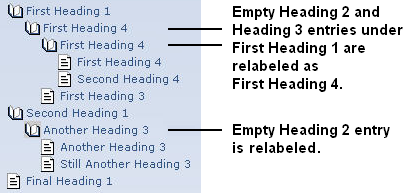
- If you want to duplicate the heading hierarchy of the source document with labels in the table of contents, set Collapse table of contents to Re-label. ePublisher automatically inserts labeled entries for the skipped levels. The heading text from the entry level appearing beneath the current entry is used as the label. The irregular hierarchy shown in the previous example would be generated as follows.
Understanding the Table of Contents and Merge Settings
Not only can the table of contents be generated from defining your heading paragraph styles, the table of contents can also be generated using Merge Settings. Merge Settings allow you to combine multiple top-level groups into a single hierarchy. Not all output formats support merging. For more information see Merging Top-level Groups (Multivolume Help).
Note: Since your Stationery design project is used to create Stationery, and Merge Settings are not stored in Stationery, you do not need to configure Merge Settings for your Stationery design project. You can configure the Merge Settings in your ePublisher Express projects, since these settings vary based on individual project needs.
Defining the Icon for a Table of Contents Entry
For some output formats, ePublisher allows you to add a marker to a heading that defines the icon to use for the table of contents entry for that heading. For example, you can use a unique icon for new topics, or for specific types of information. ePublisher provides the TOCIconWWHelp, TOCIconHTMLHelp, TOCIconJavaHelp, and TOCIconOracleHelp markers.
Creating a Miniature Table of Contents
A miniature table of contents (mini-TOC), also known as a partial table of contents, provides a list of the topics in the upcoming section. The topic titles are displayed as links beneath the current topic heading for easier navigation within the section. By default, ePublisher does not create a mini-TOC in topics within your output. You can configure ePublisher to generate mini-TOCs and you can define your mini-TOC levels in Style Designer. Before you begin, define the main table of contents for your projects. For more information, see Defining the Table of Contents Structure (Levels). Your mini-TOC is derived from the table of contents level settings you define for the project.
To create a mini-TOC
- Open your Stationery design project.
- On the View menu, click Style Designer.
- On the Project menu, click a target in the Active Target menu option that is an output format that supports this option.
- In Paragraph Styles, select the style you want to include a mini-TOC after.
- On the Options tab, specify a value for the Mini-TOC level option. Specify a value that indicates the levels of the table of contents entries to include in the mini-TOC that follows the selected paragraph style. For more information about this option, click Help.
Modifying the Appearance of Mini-TOC Entries
ePublisher stores CSS settings that control the appearance of mini-TOC entries in the
webworks.css file. You can create an override file to modify these settings for specific levels of the mini-TOC or for the entire mini-TOC. For example, you can define a different font size and margin for each level in the mini-TOC.For more information about override files and locations, see Stationery, Projects, and Overrides.
To modify the appearance of the mini-TOC
- If you want to override the CSS settings for an output format, complete the following steps:
- In your Stationery design project, on the View menu, click Format Override Directory.
- Create the
Formats\<formattype>\Pages\cssfolder in your project folder, where formattype is the name of the output format you want to override, such as Microsoft HTML Help 1.x.
- If you want to override the CSS settings for a target, complete the following steps:
- In your Stationery design project, on the View menu, click Target Override Directory.
- Create the
Targets\<targetname>\Pages\cssfolder in your project folder, where targetname is the name of the target you want to override.
- Copy the
webworks.cssfile from the following folder to the override folder you created within your project folder:Program Files\WebWorks\ePublisher Designer\Formats\<formattype>\Pages\css - Open the
webworks.cssfile you copied to your project override folder. - If you want to modify the appearance of the entire mini-TOC, find the code for
div.WebWorks_MiniTOCand modify the values specified within the braces:- To modify the background color, specify the desired RGB color value for the
background-colorproperty. - To modify the border color, specify the desired RGB color value for the
border-colorproperty. - To modify the border width, specify the number of pixels you want for the
border-widthproperty. - To modify the type of border, specify the appropriate border style value for the
border-styleproperty. - To modify the spacing between the border and the text, specify the number of pixels you want for the
paddingproperty. - To modify the font, specify the name of the font you want for the
font-familyproperty.
- If you want to modify the appearance of a specific level of the mini-TOC, find the code for
div.WebWorks_MiniTOC_Level<x>, where x is the level number you want to modify. Then, specify the values within the braces to modify the font or margin:- To modify the font of all mini-TOC entries for the specified level, specify the name of the font you want, such as font-family: Arial;.
- To modify the font size of all mini-TOC entries for the specified level, specify the size of the font you want, such as font-size: 14pt;.
- To modify the left margin indent of all mini-TOC entries for the specified level, specify the indent you want, such as margin-left: 10px;.
- Save the
webworks.cssfile. - Regenerate your project to review the changes.For example, the following figure illustrates how you could customize your mini-TOC entries.
div.WebWorks_MiniTOC_Level1
{
  font-size: 14pt;
    font-family: Arial;
    margin-left: 6px;
}

div.WebWorks_MiniTOC_Level2
{
  font-size: 12pt;
    font-family: Arial;
    margin-left: 16px;
}

div.WebWorks_MiniTOC_Level3
{
  font-size: 10pt;
    font-family: Arial;
  margin-left: 16px;
}
Last modified date: 06/23/2026